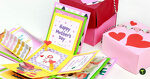
Are you on the hunt for a unique Mother’s Day craft activity that your students can create for their mums or maybe just someone who is special to them? It can be a challenge to come up with a Mother’s Day craft idea that is different, allows your students to add their own touches, and helps your students develop their skills. Until now… it’s time to teach your students how to make an exploding gift box!
Don’t be scared. These explosions are all about love. We have a simple plan for how you can easily do this in your classroom with students of most ages, giving students a chance to practise their fine motor skills, measuring with a ruler, writing, and more as they learn how to make an exploding gift box.
Are you ready to put their engineering skills to work?
How to Make an Exploding Gift Box for Mother’s Day
Before you get started, you’ll need to download and print out our Mother’s Day Decorative Square Templates.
This printable template includes a variety of plain frames and sentence starters. Students can pick and choose which they want, depending on if they are giving this to their mom or another special person in their lives.
To build up this surprise box there are three different levels. You can get your students to measure, cut, and decorate one layer a day. That way it doesn’t end up taking too long to create the box from scratch.
Step 1: The First Layer
To create the first layer:
- Cut out a square that measures 30cm x 30cm.
- Using a ruler, divide the larger square to create a grid with smaller squares measuring 10cm x 10cm.
- Cut out each corner square to create a plus sign (like the image below)
- Decorate each of the squares excluding the middle square.
We used a book of scrapbooking paper for the first layer, but you could also get your students to use stickers or draw their own designs to add some extra detail to this first layer.
Step 2: The Second Layer
For the second layer, we have added a bit more detail.
Measurements for the second layer are:
- 27cm x 27cm for the large square
- 9cm x 9cm for the smaller squares.
We have also created a mini Mother’s Day coupon book that could be added to this layer in a little mini envelope! Download our printable Mother’s Day coupon book on coloured paper, or have your students colour in the pattern.
We glued scrapbooking paper on each square first, followed by Mother’s Day Decorative Square Templates. This creates a really fun, decorative effect!
Step 3: The Third Layer
For the third layer of the exploding gift box, we used two strips of paper rather than a square piece of paper. (This is also an alternative to using large square pieces of card for each layer!)
To create the third layer,
- Cut two strips of paper measuring 8cm x 24cm.
- Use a ruler to divide each strip into three 8cm x 8cm squares.
- Glue together the middle square of each strip.
This creates the smallest plus sign for the final layer of this fun project.
This is the top layer, so you will need something in the middle square. You can even add some height to this one as it will be the middle of the box!
Step 4: Constructing the Box
Now that you have three completed plus sign-shaped layers, it’s time to piece them all together! Make sure the decorative side is facing up. You may like to check out the video below for extra support in explaining this step.
- Place the first (largest) layer face up on the table and fold up the outside squares.
- Stick strips of double-sided tape around the edges of the centre square.
- Place the centre square of the second (middle) layer on top of the double-sided tape, ensuring the strips line up (so it still resembles a plus sign).
- Repeat steps 1 to 3 for the next layer until the box has been built!
Step 5: The Exploding Gift Box Lid
To ensure that all the moms or special people get a lovely surprise upon opening this surprise gift, a lid needs to be made. Don’t worry; we’re almost there…
- Cut a square piece of paper that is 20.5cm x 20.5cm.
- Using a ruler, divide the square into a grid with the middle square measuring 10.25cm x 10.25cm.
- Cut along the ruled lines, from the edges of the paper to the corners of the middle square. You only need to cut one line for each corner. Use the video above as a reference for which lines to cut.
- Fold all of the ruled lines.
- Put glue on the smaller square ‘tabs’ created by the cuts and folds.
- Tuck the tabs into the long, rectangle sides of the lid.
- Decorate!
Tips for Younger Students
For younger grades, it’s easier to have each layer already measured and cut, so all they have to do is decorate their exploding gift box this Mother’s Day. Older students will likely be able to follow the steps for each layer and do the whole craft activity independently.
Hi Rach, yes it certainly takes some time that's for sure. We recommend doing it over a school week and having the students complete one layer a day.
This was incredible. the kids had a great deal of fun making them for mum.
That's so good to hear, Kira! Hope Mum loves it just as much!
I absolutely loved this. I used the syeps to complete the Father's Day edition and it looks stunning!
Thanks for your comment, Claire! We're glad you liked it!
cool
Thanks Kim!
Wow I Love love love this idea! You guys are craft geniuses!
Thanks!
Thanks, Malalai! We had a lot of fun making it! Enjoy!
LOVE, LOVE, LOVE this idea. Great job guys
Thanks for your kind words, Simon!
goood
Thanks Peta!
my students online all loved it
Hi Peta, It is so great to hear that your students enjoyed this craft activity! Thanks for letting us know!
ALL the students said they loved it
Hi Dakota, Thank you for your feedback! I am sure a lot of mums will get a big surprise this Sunday!
Awesome resource! Mums would definitely love it!
I have just had a mixed ability class with students from Year 2 to Year 5 and each has made an explosion Mother's Day Box! They all enjoyed it so much and are very excited to take home for mum on Sunday. Thanks so much for this fantastic resource. I can see other uses as well!
Hi Lorraine, They will be bursting with excitement when they open the box! Thanks for the lovely feedback!
I am trying to create a template so we my class can just cut out the sections easily. What size paper do you suggest people use? the a3 paper is 29.5 in width so I am struggling to work out what to use to make layer 1 and the box cover as well.
Hi Anusha, Large pieces of coloured card found at newsagents would be ideal, but paper should work too! Reducing each layer's dimensions by 3 cm would still create a fantastic Exploding Gift Box. This would allow the first layer to fit on an A3 page. The dimensions would be as follows. Layer 1: 27 cm square with 9 cm smaller squares. Layer 2: 24 cm square with 8 cm smaller squares. Layer 3: 21 cm square with 7 cm smaller squares. Lid: 17.5 cm square with the center square measuring 9.25 cm × 9.25 cm. I hope that helps! If we can assist with anything else please don't hesitate to get in touch!
THIS IS AWESOME! my mum will love it! thank you so much!
Hi Daniele, Thank you for your lovely comment!
Hello. Are you able to make some patterned squares that I can print and use as backing squares instead of using scrapbooking paper? It is easier for young students to simply cut out a ready made set of squares. Thanking you!
Hi Gry, Thank you but I meant just the decorative backing paper, not the ones that say Happy Mother's Day.
Melinda - I tagged you further down the scroll - they have them already :)
What an amazing resource! The video breaks the task down well and the instructions are user friendly for children to follow.
Hey Jan, thank you for your lovely feedback. I hope your students enjoy doing this.
it is beautiful and it turned out great
Hey Neve, thank you for your lovely feedback. It is great to hear this resource worked out well for your class.
Any chance you could you make a birthday template too? Love this idea, thanks!
Hi Galina, thanks for your suggestion. Please feel free to request a resource here: https://www.teachstarter.com/request-a-resource/ Requests are voted on by the Teach Starter community. We create the top request each week. Please let me know if you have any further questions, I'm more than happy to help.
Thanks for the Mothersday idea. I'll translate the words to the Dutch language.
Hi Armance, Thank you for your lovely comment. I am so glad you are enjoying our resources.
This looks great! I can't get the template to download however. I get redirected to a resource for anti-bullying. Any suggestions?
Hi Michaela, It seems the link had broken when we updated the site. Thanks so much for noticing this error on one of our resources. I have fixed the error and it is now ready for you to download again here: https://www.teachstarter.com/au/teaching-resource/mothers-day-decorative-square-templates-3/ If there is anything else I can assist you with, please don't hesitate to contact me.
Love this! Any chance we could get a christmas version of this?
Hi Louse, Great news, we have created a Christmas version of this resource. Check out the link below: https://www.teachstarter.com/teaching-resource/christmas-decorative-square-templates/
Hi Louise, This is a great idea! I will run it by our resource creators and see what they can come up with. Thanks so much for your suggestion and comment.
Step 5 isn't overly clear like the previous steps. Could this perhaps be a little more explicit?
Hy Brennan, thanks for your comment. We were hoping that the video along with the text explained this step. Let me have a look and try and make it more explicit for you. Thanks!
My class made these boxes this week. The finished product looks absolutely amazing and the kids are so proud of their present for mum.
Thanks so much for your comment, Amy. I'm so glad that your students enjoyed making these fun presents for their mums! I'm sure there will be some very happy faces on Mother's Day because of your efforts!
Do you have the video of making this? The same one that was posted on facebook so that I can show my kids? I can't access Facebook on my school server.
The video is in the blog post - towards the bottom, between Steps 4 and 5. Let us know if you have any issues playing it!
So gorgeous - I will be able to use it with all my children - fast workers en slow workers. Fasties will have more in their presentation but all will look great. Thank you for the black and white option as well. That way I can use colours paper or it can be a more individualised/personalised gift.
You're most welcome Zuriette! So glad that you like this idea.
We are making these and I love it! Such a simple but cool pressie. The kids are excited. Thanks TS.
You're most welcome Louise! We'd love to see the finished products. Send us your photos to [email protected]
Awesome - can’t wait to do this with my big kids. Thank you!
You're most welcome Jasmine! We'd love to see a photo of this resource when it's finished.